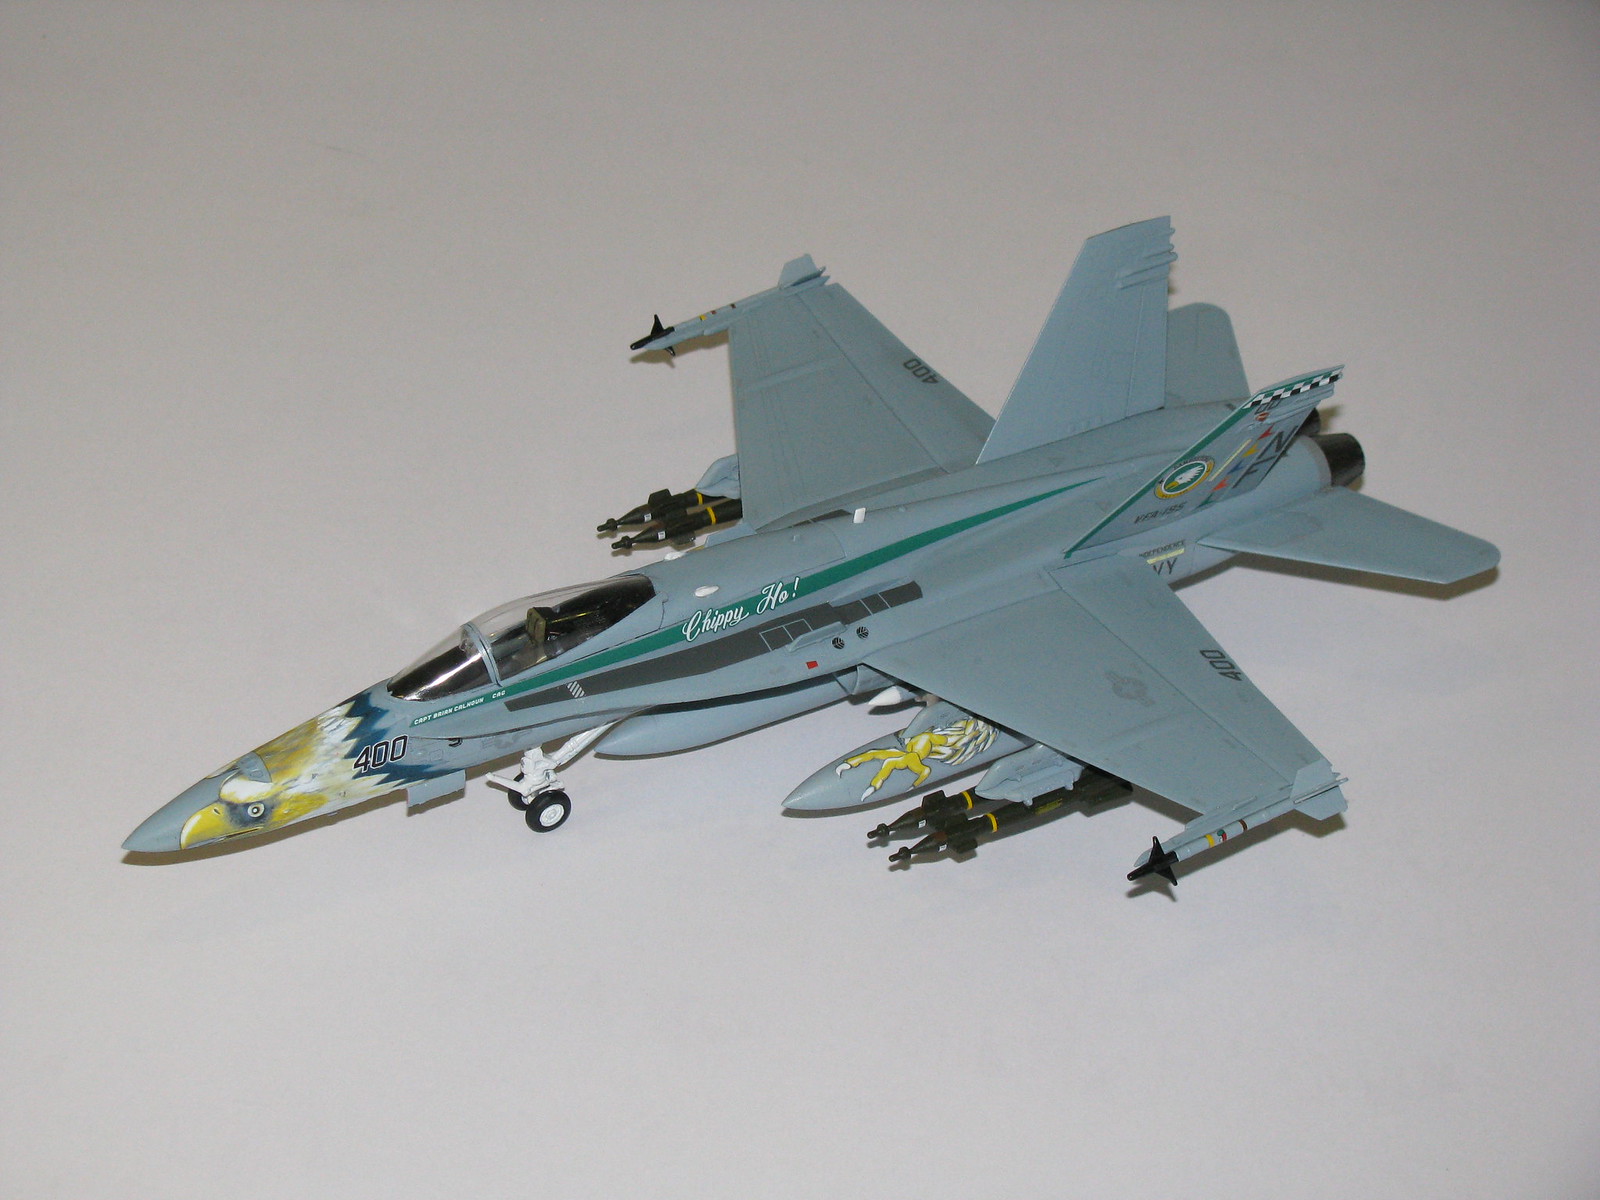
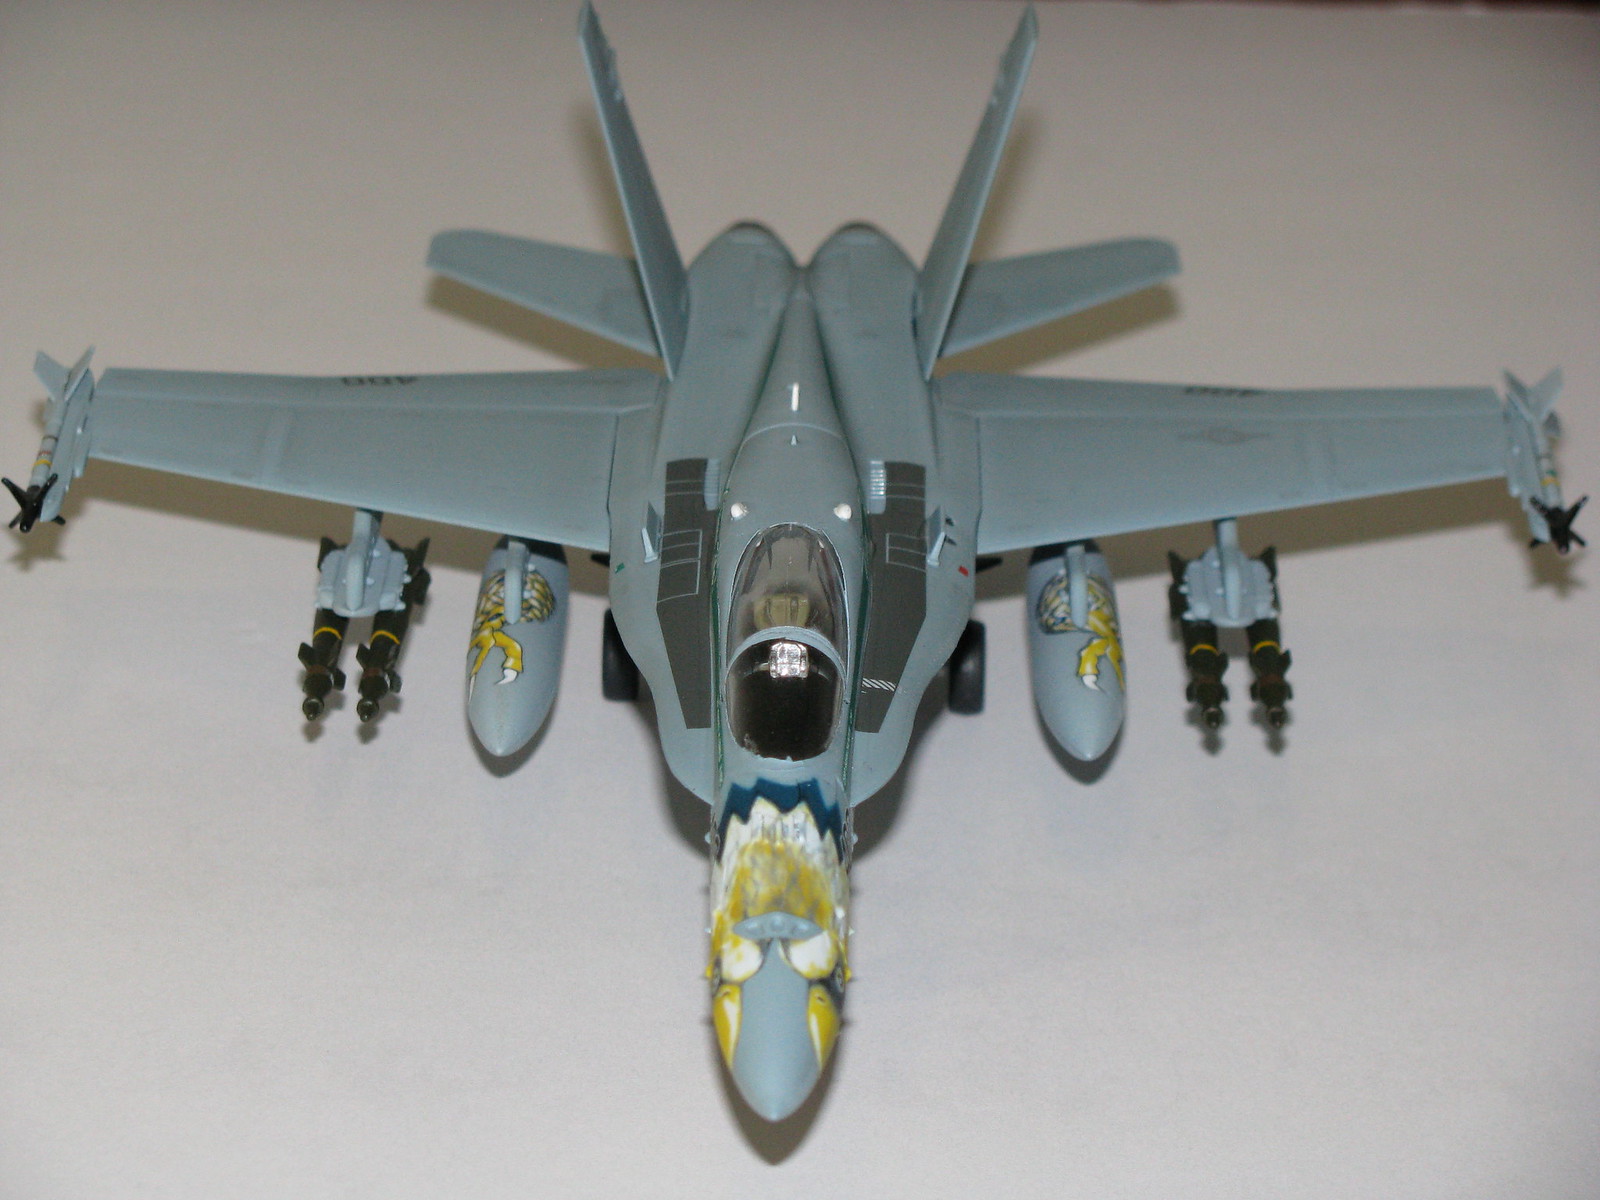
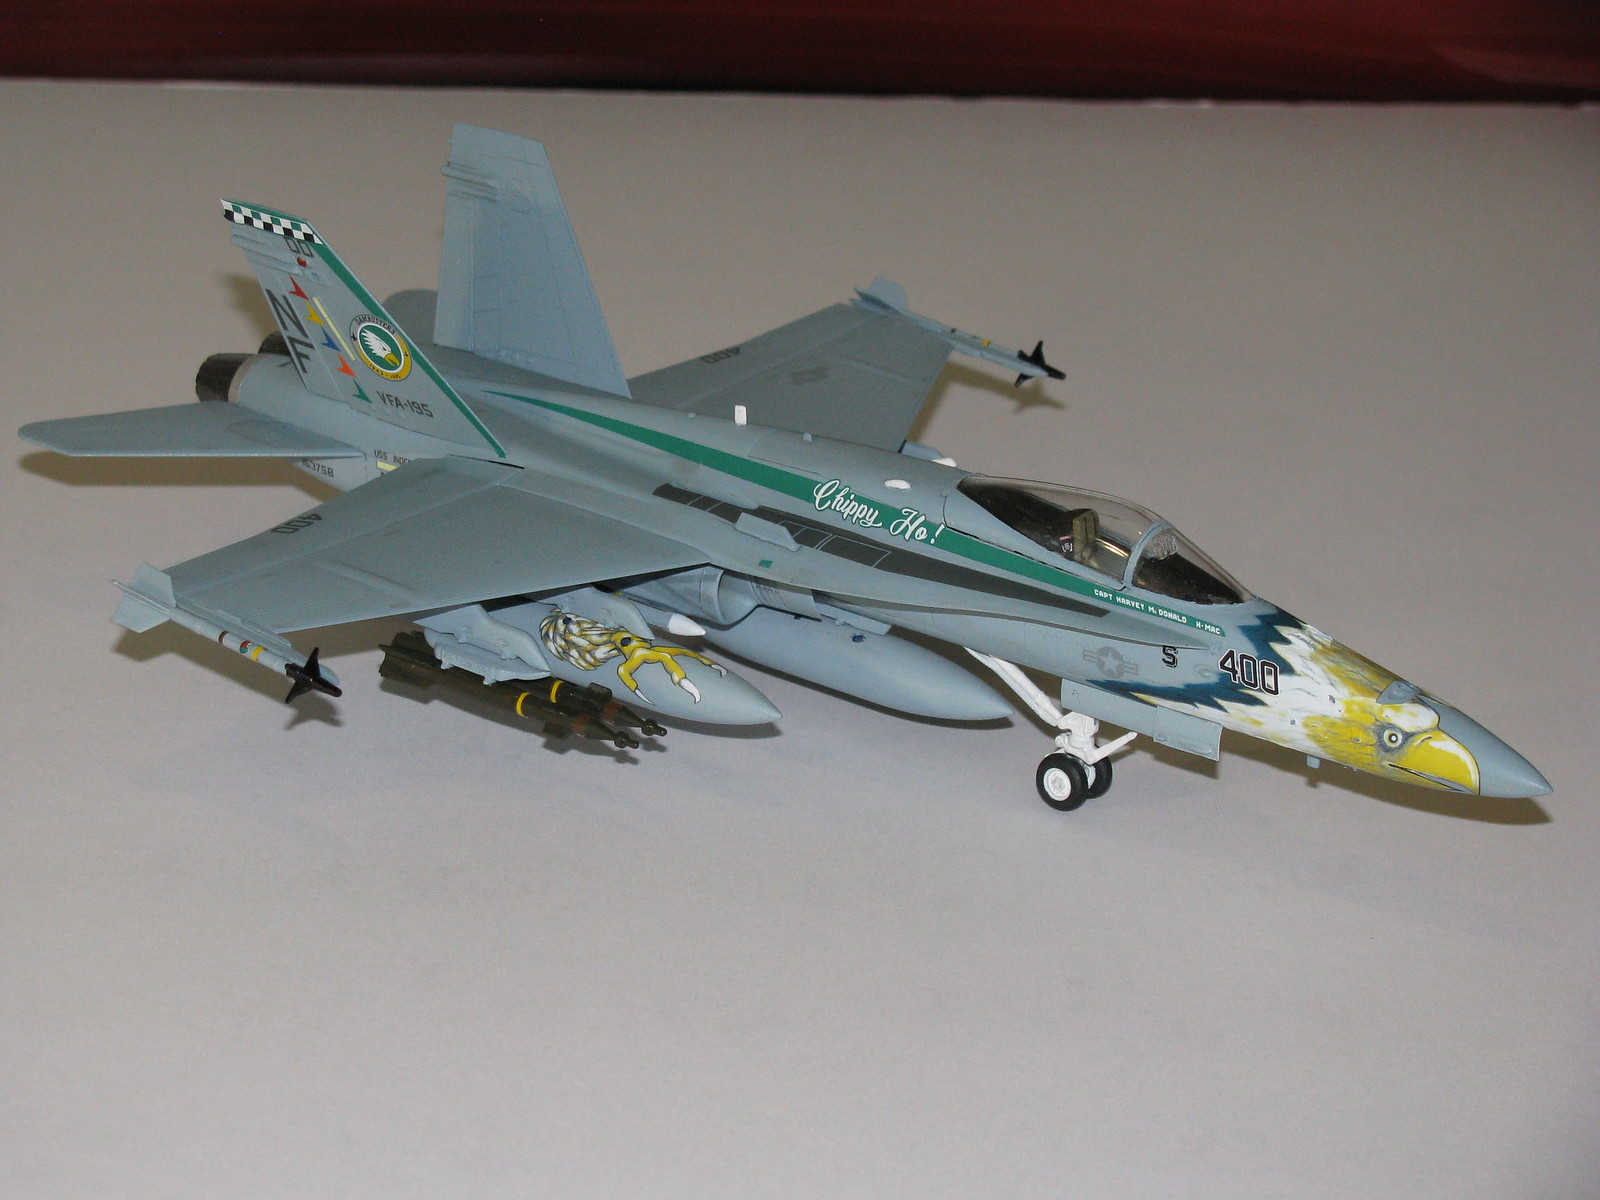
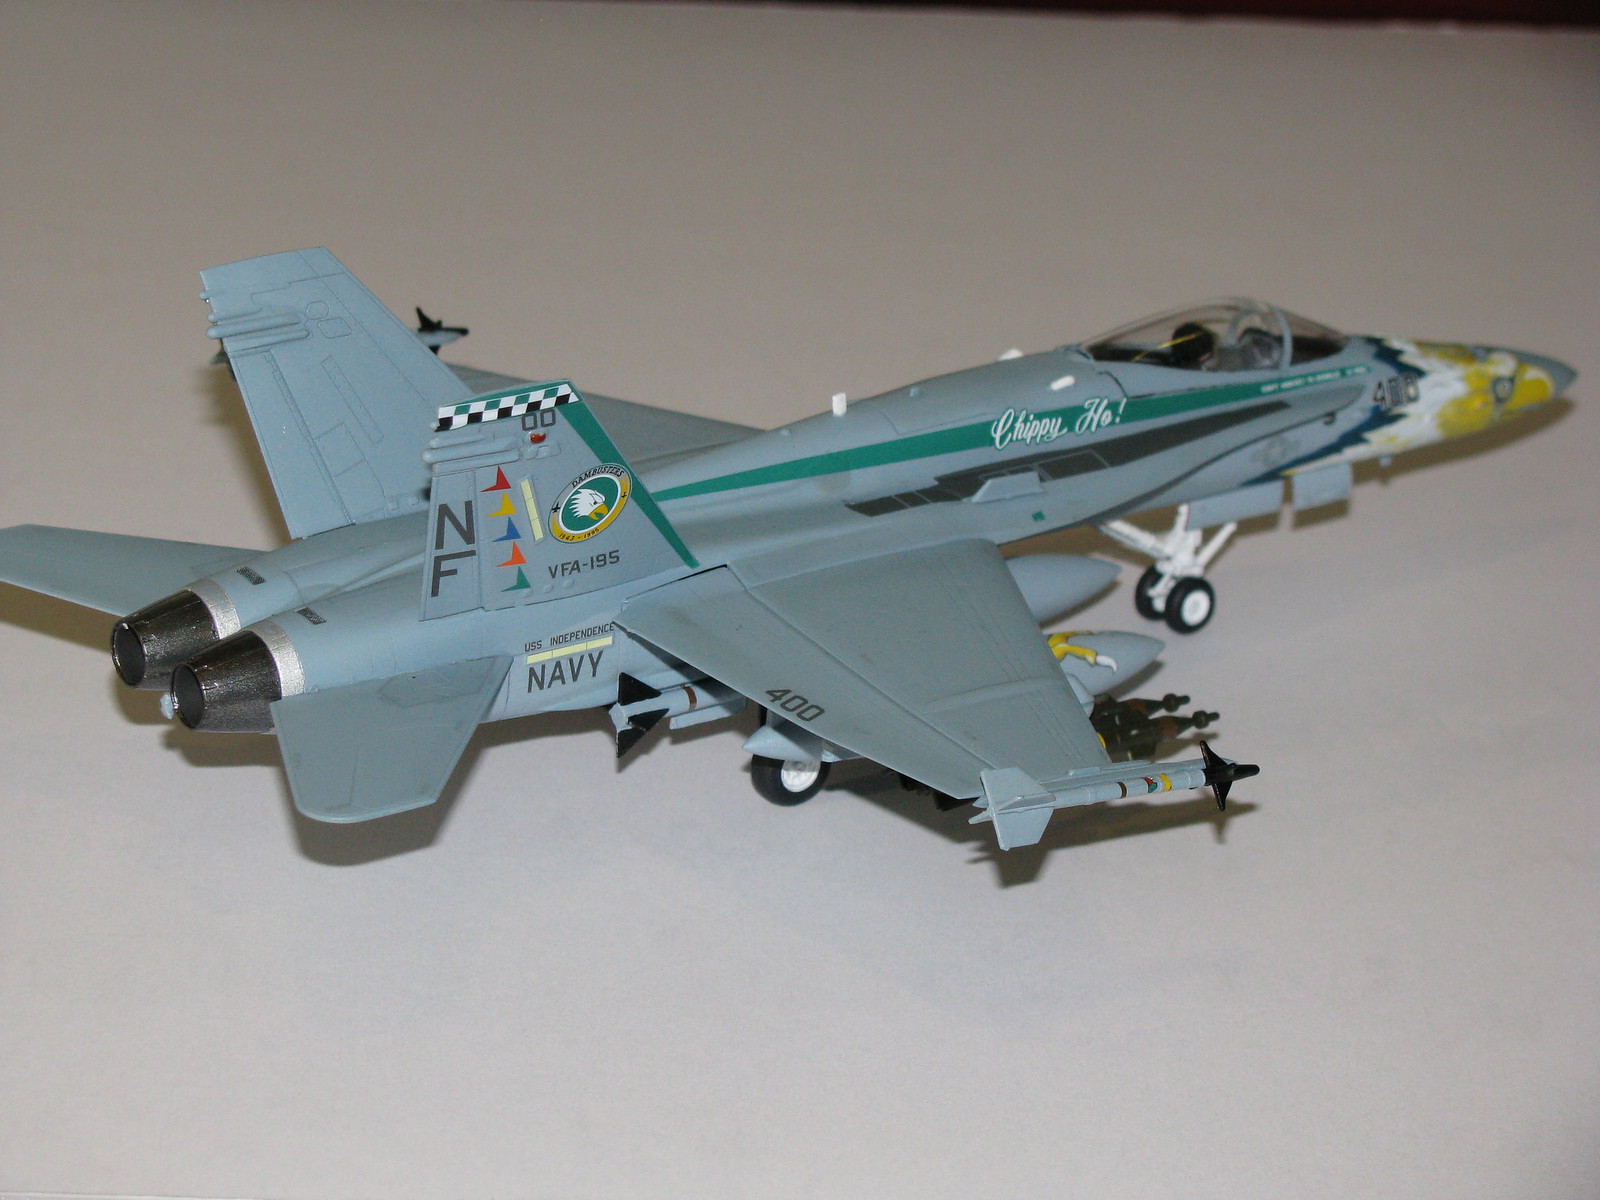
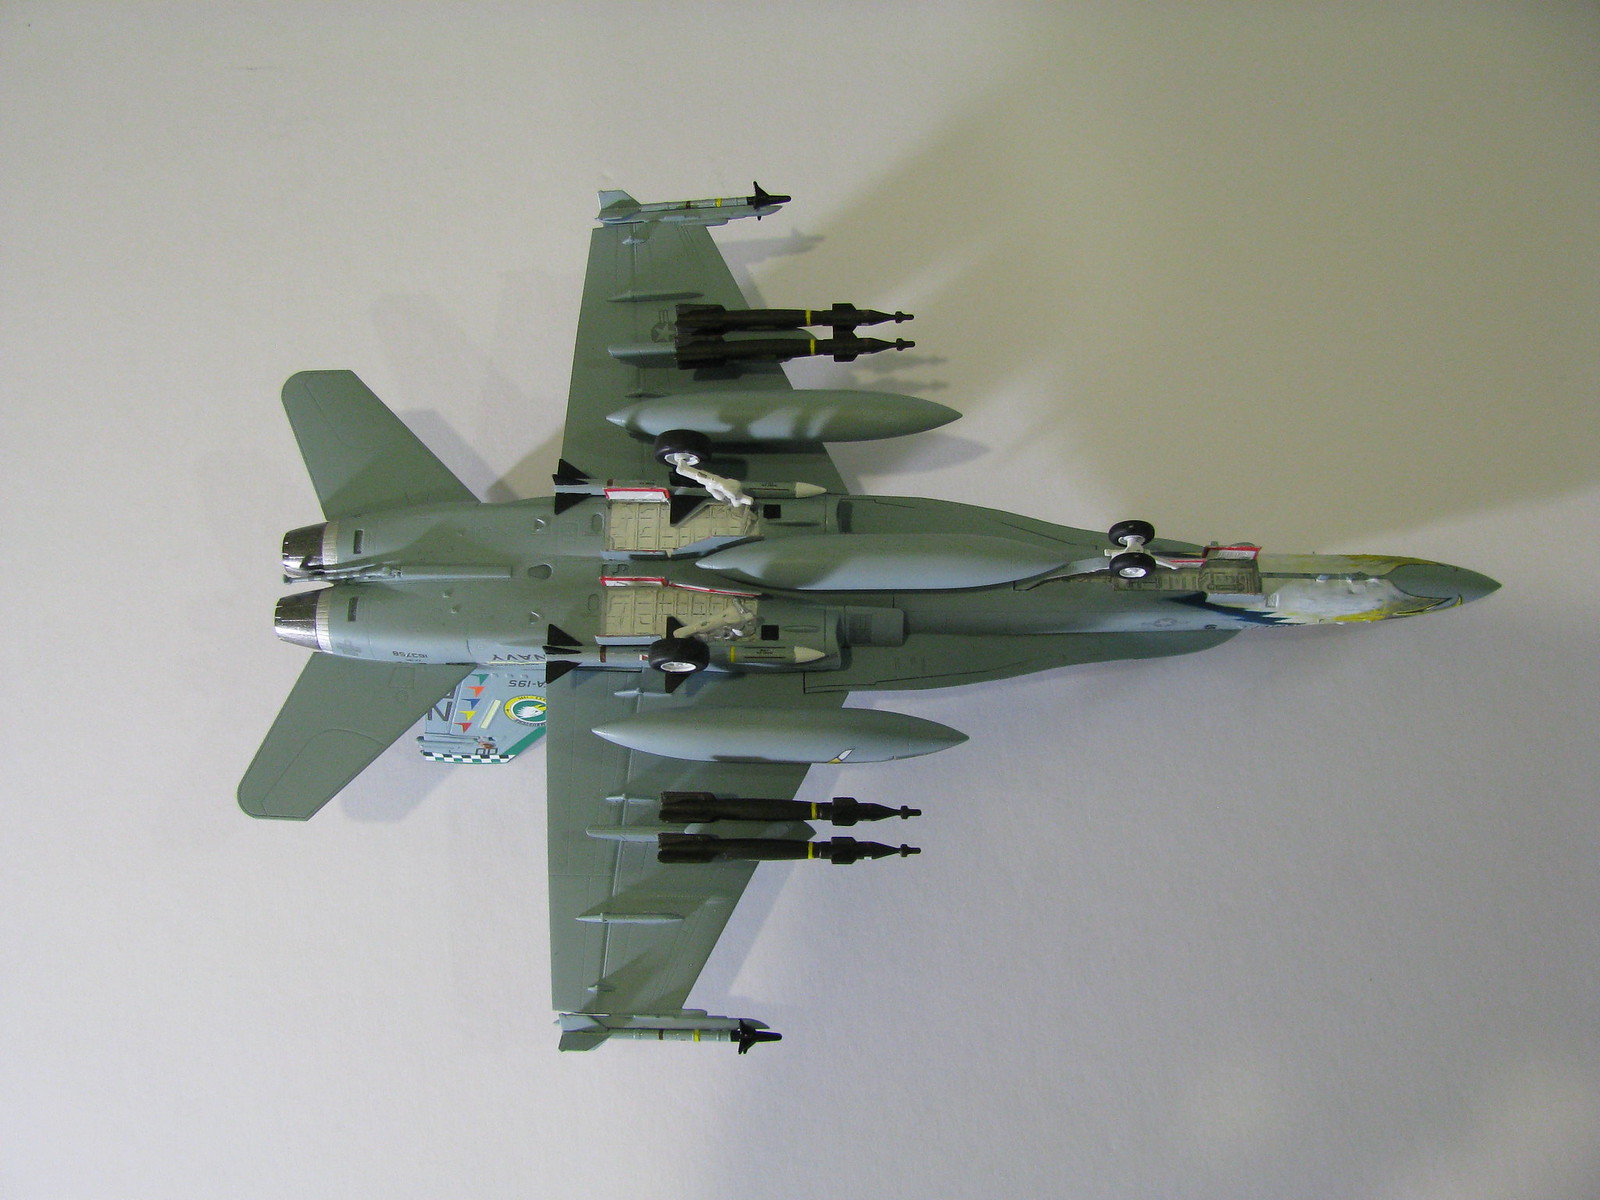
Friday 31 March 2017

Academy 1/72 F/A-18C "Chippy Ho" Hornet

This one is in the stash, looking forward to it, I've always wanted an F/18 in the collection, although the decals on the nose look daunting.

Box Art

Finished Model


Comments
This was a great build. I have built academy kits before and have not had much joy with them, but the online reviews said this was a good kit so I approached it with caution. I need not have been worried the molding and part fit was excellent and with care and patience, this builds into a very accurate F/A 18c aircraft. I do question the Tamiya light and dark ghost grey I used as they appear too blueish and dark to me, but I know having been up close to an F/A 18, they can be blueish in the right light. I also debated going semigloss or matt, but in the end, I went matt only becuase I know being up close the aircraft are always matt and you never see any shine on them. I think I made the right choice.
I learnt a lot on this kit and developed a few new skills around seam line filling using glue instead of filler, but overall I was very happy with the way it turned out and this will make a fine addition to the collection.

Rating:
Instructions - 3 - very easy to understand

Assembly Complexity - 2 - Requires moderately experienced person to do this one

Quality of Molding - 3 - Excellent quality, fine detail, no flash

Part Fit - 3 - Excellent part fit, but be warned its not a snap fit kit, it requires finesse and patience to align all the parts exactly.

Overall Score 11/12

Paints Used
Fuselage - TamiyaAS25 - Dark ghost Grey
Underside - Tamiya AS26 - Light Ghost Grey
Cockpit- Tamiya XF-53 Neutral Grey
Wheel wells - Tamiya XF-2 Matt White
Jet Exhaust - Tamiya X-10 - Gun Metal on outside and XF-84 Burnt iron on the inside
Antiglare strip - Tamiya XF-1 Flat Black
Wheels - Tamiya XF-85 - Rubber Black
Clear Coat - Testors Dullcote 1260

Airfix 1/72 Douglas A-4B Skyhawk

Big fan of this plane, not a big fan of this kit from Airfix, read on...

Box Art


If you want to see the build progress click here

Finished Model


Comments
Ok, this was not a happy build. I don't know if i was cursed, going through a form slump or it was the below average quality of the kit or all three, but I didn't enjoy this kit at all.
It makes into an accurate enough rendition of the venerable skyhawk but putting it together was a bit of a pain.
Firstly the parts:
- Airfix have attached the parts to the sprue with needlessly thick sprue lugs and it made cutting a bit more risky that it needs to be, not to mention the cleanup afterwards.
- There was a large gouge on the left hand fuselage piece. Fortunately a large decal covers it.
- The missiles and bombs slot does not fit into the bomb rack as its too small
- The drop tanks do not fit together evenly and require sanding to make them align properly
- The wing gunport pieces have a large curve at the end of them that needs to be straightened out at the risk of breaking the piece
- The cockpit canopy won't sit flush unless you carve a bit off where it hinges onto the fuselage
-The wheel covers for the main undercarriage do not fit correctly into the fuselage slots because the lugs are too big
- The panel lines oh the panel lines - these are trenches that give the star wars death star trench a run for its money - why Airfix?
- The decal for the "danger" label on the air intake does not fit. The air intakes are convex cone like in their shape and there is no way a straight line red decal is going to fit around it. I had to cut them and somehow work them so they could resemble a red line, but it was an unsatisfactory job.
- No decals for the tailhook striping - what kit doesn't provide that these days?

All in all a very unsatisfactory experience and clearly a kit that was designed by the Airfix "B" team as its nothing like the quality of their other new toolings.
Don't get me wrong, jsut about everyone of these issues is fixable with a little amount of effort (except the decal idiocy) but that's not what I expect from Airfix in 2017.

Rating:
Instructions - 3 - very easy to understand

Assembly Complexity - 3 - very easy to assemble

Quality of Molding - 2 - Ok but can be better, there were some defects in the kit components and very thick sprue attachments.

Part Fit - 1 - Unsatisfactory - quite a few components don't fit well. I have seen much worse, but this is clearly the Airfix "B" team new tooling.

Overall Score 9/12

Paints Used
Fuselage - Tamiya AS16 Light Gray (USAF)
Underside - Tamiya Matt White
Cockpit- Tamiya XF-53 Neutral Grey
Wheel wells - Tamiya Matt White
Jet Exhaust - Tamiya X-10 - Gun Metal
Antiglare strip - Tamiya XF-1 Flat Black
Leading Edge - Humbrol 19 - bright red (Had some left over fmor years ago - never again stuff takes too long to dry and doesn't like Tamiya Gloss Clear)

Friday 24 March 2017

Airfix 1/72 Hawker Siddley Harrier GR.1

Picture this, I am at the hobby store, I have my next models under my arm, the Airfix Beaufighter/Focke Wolfe 190 double set, ready to go to the counter when I walk past a display table with a sample of their finished models on it. Staring at me were some F18,s Harriers, Sabre's, Tomcats, etc so I stopped to have a gaze.
That motivational wave of WW2 fighters suddenly drained and the beaufighter/fw190 went back on the shelf in favour of a Harrier, Skyhawk and an F/18. Yep that's right, I'm moving onto jets. Maybe the WW2 streak will return because I still want to do those two, but for now we'll have a wave of 1/72 jets and the Harrier was always a personal favourite of mine.

Box Art

If you want to follow the build, go here.

Finished Model


Comments
Great build of this famous British VTOL jet. All parts went together very well, only exception being the bottom of the engine cowlings where they meet the fuselage but a bit of PVA glue filler was all that was required and the gap was filled nicely. The decals are a completely different story. There are a LOT of decals and they are very small so set aside lots of patience and time and don't do it all in one sitting or you will go mental.

Rating:
Instructions - 3 - very easy to understand

Assembly Complexity - 3 - very easy to assemble

Quality of Molding - 3 - Very good - New airfix tooling has been consistently excellent so far

Part Fit - 2.5 - all went together very well but lost marks because of the engine cowling not quite fitting right. Hopefully it wasn't me, but you never know..

Overall Score 11.5/12

Paints Used
Fuselage - Tamiya AS-31 - Ocean Gray 2 (RAF), Tamiya AS-9 - Dark Green (RAF)
Underside - Tamiya AS-16 - Light Grey (USAF)
Cockpit- Tamiya XF-53 Neutral Grey
Wheel wells - Mr Color 332 Light Aircraft Gray <-- found out I have to use special Mr color thinners to clean brushes, never buying these again.
Jet Exhaust - Tamiya X-10 - Gun Metal

Monday 20 March 2017

My Old Battletweety Blog

I actually had a blog from years ago when I was mucking around with various models. May as well link it here.

Battletweety Blogspot

I was putting an R/C motor in a 1/200 Sovremenny at the time, it really went like the clappers.

Friday 17 March 2017

Tamiya 1/72 Mosquito FB Mk.VI

Well this will be a labor of love. The mosquito is up there as one of my all time favourite WW2 planes. The rumor is the Tamiya version is the best 1/72 scale model on the market, so I'll be taking a lot of care to enjoy this one.

Box Art


If you want to follow the build go here.

Finished Model


Comments
This was a very easy and enjoyable build. Who can resist a Mosquito, they are a beautiful aeroplane. I did struggle with the decals on this one, despite my tried and true method of putting down clear gloss first then covering over with matt gloss. The decals did have trouble settling over the bumpy bits. I also forget the tanks that go on the landing gear, but no one is going to notice. All up another highly recommended kit.

Rating:
Instructions - 3 - very easy to understand

Assembly Complexity - 3 - very easy to assemble

Quality of Molding - 3 - Very good - Tamiya are always reliable in this department

Part Fit - 2.5 - all went together very well but lost marks because of the way the rear engine cowling is put together. that could be better and the bomb bay doors were a very tight fit that didn't quite go flush.

Overall Score 11.5/12

Paints Used
Fuselage - Tamiya AS-31 - Ocean Gray 2 (RAF), Tamiya AS-9 - Dark Green (RAF)
Underside - Tamiya AS-11 - Medium Sea Grey (RAF)
Cockpit- Tamiya XF-71 - Cockpit Green
Wheel wells - Tamiya XF71 - Cockpit green and Tamiya XF-16 - Flat Aluminium
Propellor - Tamiya X-10 - Gun Metal

Airfix 1/72 F-51D Mustang

I've always admired the mustang with its full view cockpit and big air intake underneath. I grabbed this from the hobby shop as I was looking for the tamiya corsair and not paying much attention, grabbed an F51D instead of a P51D,  the distinction being this a Korean War era plane rather than a WW2 one. Not be undeterred, it should build into a nice model. I might pick up a WW2 P51D sometime in the future.

Box Art

Finished Model


Comments
This was a nice build. My first attempt at natural metal finish (NMF) and its come out quite well. I did a gloss black undercoat, then a tamiya NMF Silver spray over the top. One thing I did do which I think made a huge difference was put the tamiya silver spray into hot water for 5 minutes before spraying. Doing that caused the spray to come out as a nice fine mist and it went on very smooth over the gloss black. The decals are incredibly detailed, more than I have seen on any other aircraft in this scale. Thumbs up for this one, highly recommended!!

Rating:
Instructions - 3 - very easy to understand - designed for beginners

Assembly Complexity - 3 - very easy to assemble, good for beginners

Quality of Molding - 3 - Very good - the new airfix toolings are excellent

Part Fit - 3 - all went together very well.

Overall Score 12/12

Paints Used
Underside & Fuselage - Tamiya TS-14 - Gloss Black (undercoat), Tamiya AS-12 - Bare Metal Silver
Cockpit- Tamiya XF-71 - Cockpit Green
Wheel wells - Tamiya XF71 - Cockpit green
Propellor - Tamiya X-10 - Gun Metal

Monday 13 March 2017

Tamiya 1/72 F4U-1A Corsair

Well who can't resist the temptation to build a WW2 corsair, especially one that depicts Pappy Boyington's plane. During this wave of motivation I have to build WW2 fighters, this one has to be close to the top of all time favourites.

Box Art
Finished Model


Comments
I actually had a tough time on this one. First of all, after having done the Airfix kits and being lulled into a false sense of security with parts fitting together, the corsair fuselage halves dried together slightly out of alignment. Something I should have picked up if I'd paid better attention. Good thing is its only noticeable by the guy that built it. The wings also suffered from the same problem, it was only after the halves dried that I noticed the gun ports were not right so a bit of drilling fixed that.
I also had a tough time with the Tamiya matt white. I oversprayed it and it dribbled everywhere making a bit of a mess over the top of the fuselage as I had the model upside down while spraying. Damn annoying but I have to learn to spray matt white sparingly as its so damn runny.
The cockpit on this model is incredibly well detailed for this scale. I was very happy with the way it turned out. Overall, its not one of my better efforts but it'll do. Who can resist having a Pappy Boyington corsair in their collection. :)

Rating:
Instructions - 3 - very easy to understand - designed for beginners

Assembly Complexity - 3 - very easy to assemble, good for beginners

Quality of Molding - 3 - Fantastic, which is what I expect from Tamiya

Part Fit - 2.5 most parts were perfect but you have to be careful to align the body halves properly and the wing halves carefully, its not an automatic fit or snap together.

Overall Score 11.5/12

Paints Used
Underside - Tamiya TS-27 - Matt White, Tamiya AS-19 - Intermediate Blue
Fuselage - Tamiya AS-19 - Intermediate Blue, Tamiya AS-8 - Navy Blue
Cockpit- Tamiya XF-71 - Cockpit Green
Wheel wells - Tamiya XF-4 - Yellow Green

Saturday 11 March 2017

Airfix 1/72 Messerschmitt Bf109E-4

Well modelling fans, I'm onto my next one straight away. Another new tooling from Airfix, the mainstay of the German Luftwaffe, the ME 109.

Box Art

Sprues

Finished Model


Rating:
Instructions - 3 - very easy to understand - designed for beginners

Assembly Complexity - 3 - very easy to assemble, good for beginners

Quality of Molding - 2.5 - some very minor flash, not perfect, but nothing a quick sand here or there can't fix. Detail on the starboard fuselage where the wing meets the fuselage, was obscured. Perhaps a factory quality issue there

Part Fit - 2.5 most parts were perfect but some parts needed a bit of  sanding or were a tight (buckling) fit.

Overall Score 11/12

Paints Used
Underside and lower fuselage - Tamiya AS-5 - Light Blue
Camouflage - Tamiya TS-2 - Dark green, Tamiya AS-29 - Gray-Green
Cockpit and wheel wells - Tamiya As-29 - Gray Green (I think this may be a little too light coloured compared to the real thing, but I went with it anyway.)

Friday 10 March 2017

Airfix 1/72 Spitfire Mk.Va

Well here we go, first ww2 fighter I've done for at least 15 years. I chose the iconic Spitfire as its easy to build, everyone recognises it and it looks damn nice.

Box Art


Finished Model


Its an out of the box build (OOB). At 1/72 scale I don't plan to buy any after market items.
I've learnt a lot over the years and although there are a few bits that need cleaning up on this one, its my first for quite some time and I'm reasonably happy with the way it turned out.
I was planning on doing the panel lines, but I decided against it as the airfix panel lines are decent without any extra effect.
I painted the model camouflage initially, then gave it a coat of clear gloss, put the decals on and finished off with a Tamiya clear matt.

Rating:
Instructions - 3 - very easy to understand - designed for beginners

Assembly Complexity - 3 - very easy to assemble, good for beginners

Quality of Molding - 3 - no flash, very sharp definition

Part Fit - 3 parts fitted together perfectly, all parts well engineered

Overall Score 12/12

A perfect score for the first one. This really was a breeze to put together and probably designed by Airfix so that anyone can build it, but that doesn't belittle the superb accuracy and sharpness of the kit. A very enjoyable kit for all levels if you want a fantastic looking spitfire!!

Paints Used:
Underside - Tamiya AS32 - Medium Sea Grey 2
Camouflage - Tamiya AS30 - Dark Green 2, Tamiya AS31 - Ocean Grey 2
Cockpit - Tamiya XF51 - Khaki Drab

Scale Model Builds - Intro & Rating Scale

I'm a 43 year veteran of modelling, with my first ever model being a Matchbox P51 mustang (Dooleybird) at age 7. That kicked off my lifelong plastic model fetish. I recently had an itch to build some ww2 fighters, given the tooling these days is so much better than the matchbox and airfix kits I used to muck around with when I was a kid. Its also been a long time since I've done ww2 fighters so I'm surfing the wave of motivation while it lasts.
With each of my builds, I'll give a list of the paints I used, a rating based on my own criteria and any issues that I found in the build. Almost half the time spent on modelling seems to be research and working out the correct paints to use so I hope this helps anyone looking for some easy information. I'm an unabashed Tamiya spray can fan so if I can get one to nearly match, I'll use it.

My rating scale will be as follows:


Instructions
3 - very easy to follow and well laid out
2 - ok to follow, some things not explained very well, experience needed
1 - complex instructions, very difficult to understand or follow

Assembly Complexity
3 - very easy to assemble, good for beginners
2 - moderately difficult, not recommended for beginners
1 - very complex, experience needed

Quality of Molding
3 - no flash, very sharp definition
2 - some flash or some parts not quite accurate or poorly defined
1 - a lot of flash, parts molded poorly or inaccurately

Part Fit
3 - Parts fitted together perfectly, all parts well engineered
2 - most parts fitted together well, some required filler or slight modification
1 - poor fit of many parts, much filler and sanding required